Cheap and cheerful Zoom digital piano lessons
I’m giving some online music lessons. I have been successfully using Zoom with Midi instruments for about 4 months now. This article is long because I do cover “almost” solutions before the one that works. You might be trying to get these “almost” to work – but they won’t. The solution does work very effectively for the situation where both teacher and student have digital/midi instruments. Feedback/suggestions welcome.
I have a Roland RD64, not a “real piano.” I use a Mac (currently on Mojave). And am using Zoom as the platform.
If you are using a piano, violin or other instrument, your microphone is going to do all the mixing you need. If you are using a digital instrument, why would you want to deal with microphone positioning when you have USB output.
However, going digital means learning far more than you ever wanted to know about Apple’s core audio, and Zoom’s features and limitations.
Here’s my story.
Playing a digital piano in Zoom
A first attempt – use line-in
One simple solution is use an audio-jack to USB connector from the audio output of the Roland to the Mac line-in. Zoom sees it as an alternate input, so I can switch Zoom input from the microphone to the Roland output. Everyone else hears the music fine.
But that is only half the solution. Everyone *except me* hears the keyboard. The other half is to run a Garageband project with audio line input, and press the Monitor button. The music comes through your headphones and you hear what you play.
The big downside to this is that you have to switch your outputs – do you have the microphone on or the piano. And when you start talking and the others wave frantically that they can’t hear you, they assume they have a problem with their setup that suddenly “stops working”
A Second Attempt: Mixing the Inputs
Zoom doesn’t seem to play well (yet) with aggregate channels in the Mac Core Audio. I tried creating a stereo channel that mixed Garageband output with the microphone, and it worked delightfully in Audacity. But the stereo option in Zoom picked its own selection from the aggregate and it didn’t work as I hoped.
The second solution works very well when only you need this complexity. For this solution H/T svconline . They were working with ProTools. I just use humble Garageband , but their idea woreds really well for me too.
I have included these steps in case your use-case can benefit from it. You may want to skip this section to the solution I use, which allows both sides of the zoom link to play midi and talk.
Their workaround is to make use of the “share computer sound” mixing that Zoom does behind the scenes when you do a “screen share” presentation. Zoom seamlessly mixes your voice/microphone with the content you are showing.
It can use the midi-in from the keyboard, not t the line-in. Zoom will mix voice and the midi output of your keyboard via Garageband into your Zoom session.
We create a multi-output channel on the mac that sends both to built-in output (so you can hear with your headphones) and also to Zoom (so others can hear it too). We then set the output of Garageband to this channel when you play the midi instrument.
In Zoom the sound setup is not changed: the microphone is your Zoom input, and your headphones are the “speakers.” But when you go into “share screen,” Zoom mixes the “computer sounds” from Garageband with your voice with no noticeable latency.
Here are the steps.
Step 1. Start a Zoom session on your own. No need for anyone to join. Now press “share screen.” Before you share, toggle the button that says “share computer sound.” At this point you might get a security check from the mac, as Zoom is installing it’s audio driver ZoomAudioDevice. We need access to this ZoomAudioDevice for all of this to work.
Step 2. Run utilities/Audio MIDI setup. “ZoomAudioDevice” should now be in the list of audio devices. At the bottom of the dialog, press + and choose “Create Multi-Output Device”. I rename this new device Zoomlink to remember what it is for, and to avoid typing “MultiOutputDevice” in the rest of this note.
Step 3. Set up this new device. With the new Zoomlink aggregate selected, toggle two of the devices listed to the right. The order you choose them is important. First choose “Built In Output.” Then choose ZoomAudioDevice
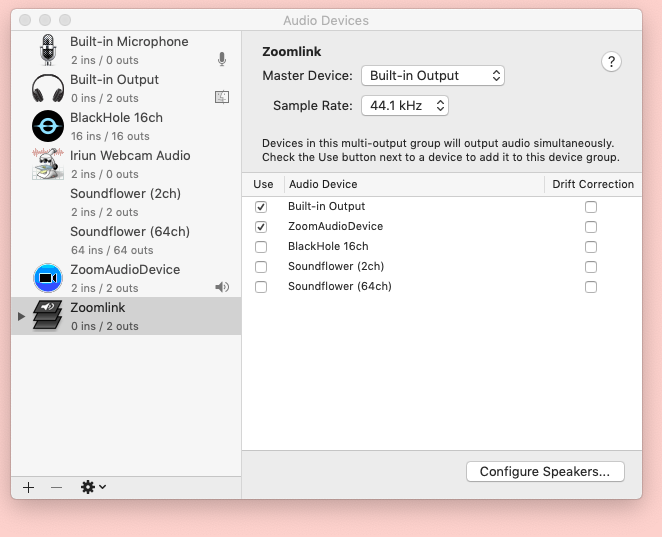
That’s all the hard work. Going forward we will use our new ZoomLink. Don’t accidentally try to use Zoom’s own ZoomAudioDevice instead
Now, restart your computer.
Step 4. Plug in the digital keyboard using its USB Midi output, if not already connected. And start GarageBand.
Step 5. Create a new Garageband project using the digital keyboard as its midi device. But before you press “Create,” check the fine print at the bottom left of the page, where it says “I hear with built-in output. Click that and change Garageband output to your new ZoomLink (not ZoomAudioDevice). The GarageBand audio panel may popup to show you your new setting..
Step 6. Plug in your headphones. Make sure you can hear yourself when you play. You may get some crazy feedback effects going forward if you are not using headphones
Step 7. Start up Zoom, and set it to use your microphone for input and your Built-in output (headphones) as speakers .
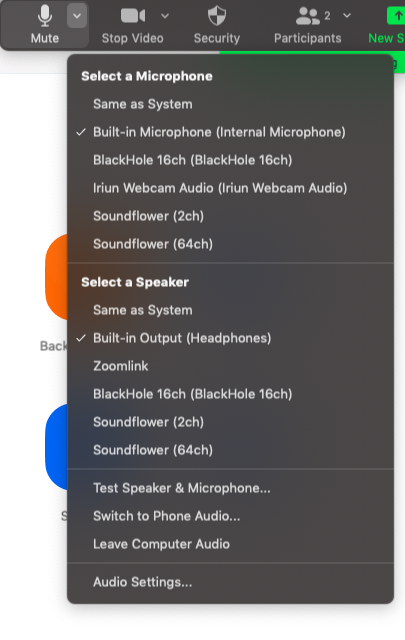
Step 8. Testing your setup is easy. Invite yourself (through a different email address) to the zoom session, accept it on your phone, and put your phone headset just in your left ear under your headphones. Then you will hear your side of the Zoom call in your right ear and in your left ear you will hear what the other person hears.
Step 9. Now “share screen,” making sure “share computer sound” is toggled on – or your listeners won’t hear the midi output (although you will)
Step 9. Talk and play.
If you hear your voice and no piano, are you in “screen share”? If you hear piano and no voice, you may have to check all your settings. If you hear feedback take the headphones off immediately or unplug them. Do this before you try to switch off the sound. Otherwise…
I’d like to be able to mix everything without letting Zoom do it for me – but I am not there yet.
The solution. Two DAWs are better than one. And Blackhole is awesome.
The last attempt does work if you need to mix voice and midi. But if you and your student want to use it, Zoom does not allow the “computer sound” trick if you are both sharing your screens. Or maybe it only allows one at a time – whatever the reason, it becomes hard to use.
So I looked again.
I had been using one DAW (Garageband) and I was using it for midi input. And I was trying to build aggregate and multi-output devices combining the microphone (which is an input) with the DAW output.
In this use case, I cannot simply have a voice and a midi track in Garageband, since I want an aggregate output from Garageband that will send the midi to my headphones as well as out to Zoom. I need to hear the mid in my headphones with no latency, but not some weird echo of my voice.
The solution is to use a second DAW to process the microphone input. That way the task is to merge two DAW outputs. Not trying to merge a DAW output with microphone input. Yes it is obvious. Where did I put my retrospectivescope.
I chose Audacity as it is an old friend, and allows me to monitor inputs easily.
Step 1: download Blackhole (a modern version of Soundflower) from GitHub – you will have to register with an email address, and it sends you a download link.
Step 2: go to the Audio MIDI setup. Blackhole should be in the list of devices.
Step 3: Create a Multi-Output-Device (lets call it chaos) that consisted of Built-in Output, and Blackhole. You should enable (use) Built-In Output before Blackhole.
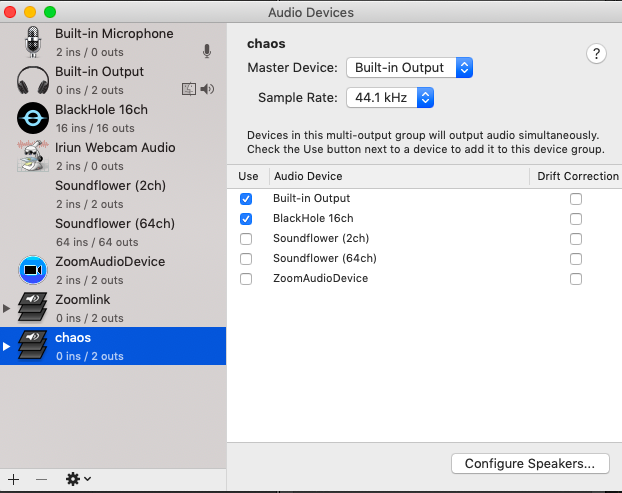
Step 4. Restart the computer.
Step 5: Make “chaos” the output from the midi instrument in GarageBand. Similar idea to before. Because the aggregate also has the built-in output, I hear it through my phones, and Zoom can send it down the wire.
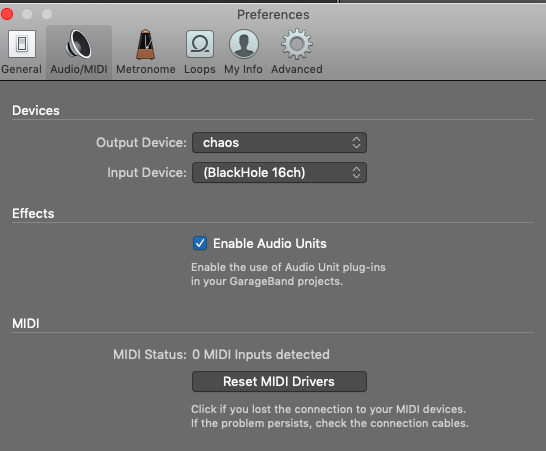
Step 6: The change-up is to run Audacity. With old versions you need to create an Audio track. With the latest version, 2.4.2 that you download here there are just two steps.
First you set up its audio devices. We are using Audacity as a special channel for the microphone, so its input is the Mic and its output is Blackhole (mixing with the output of Garageband).
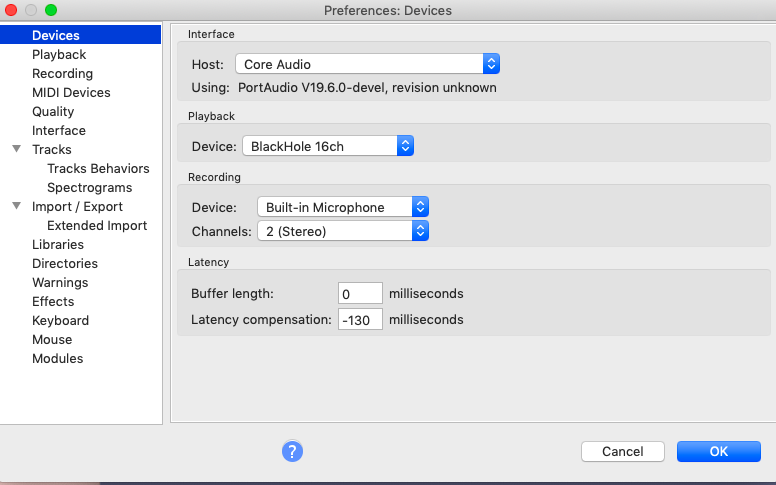
.
Next you use the “recording meter toolbar” and “Click to Start Monitoring.” In an older version of Audacity I had to create an Audio Track first.
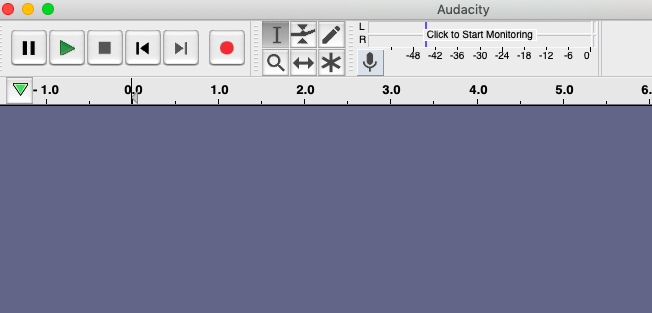
Step 7: In Zoom, the “microphone’ is… Blackhole (not chaos). The result is that midi and voice are mixed in the Blackhole device and passed through to Zoom. And the speakers are your headphones. Test it in Zoom’s audio setup dialog, and maybe with yourself using another email in a real Zoom session.
This works for teacher and student. Both can be working with their digital piano through headphones and Zoom without risking waking the dead. It should also work with other free and purchased DAWs available on MacOS. Audacity seemed like the simplest solution..
I don’t think there is a downside to this. If the student doesn’t yet know about Blackhole and Audacity, then they learn about two excellent free resources. And they don’t have to mess with the ZoomAudioDevice, and we are not dependent on Zoom still working as advertised.
Overhead View
The other challenge was to create an overhead view of the keyboard. The pros use fancy webcams and boom mic stands and adaptors to position their camera overhead.
I used my phone rather than a webcam.
Since I have a high shelf near the keyboard, I didn’t need the boom mic arrangement, and instead bought a gooseneck phone-holder – usually intended for hands free conversations. It attaches to my shelf and I can adjust it to position the phone at the right distance.
Initially I connected the overhead-phone separately to the Zoom meeting – but that seemed to overload my wifi, and was a clumsy extra participant in the meeting when it went wrong. Now I use the phone as a virtual webcam. I couldn’t use Droidcam as it only works with Windows. But the Iriun apps on the phone and mac “just work” . . At first my version of Zoom didn’t show the virtual cam, but an upgrade to 5.x fixed things.
The result is that I can switch audio between keyboard and microphone, and video between normal and overhead as well, all from the same Zoom dashboard. And the total cost was about 20 bucks for the gooseneck.
When used with voice/keyboard mixing in screen share, what I do instead is to run the Quicktime viewer on my screen, with input from the webcam. But sometimes it is useful to display it from Zoom directly.
The only thing to remember to check before you go live is that the overhead view isn’t mirrored – the left side of the keyboard is really on the left side of the window.
postscript: these settings have worked fine for the last few months – with one addition. Zoom applies filters to the sound connection to improve the quality of voice. These filters chew at piano sounds, particularly when both people are playing either at the same time or close. In your zoom settings you can toggle to “allow original sound” and then this option appears onscreen for both sides to allow (or not). This solved the sound quality problem.


Leave a Reply